Fashion Landmark Detection with CNN
Written on May 27th, 2020 by Daniel E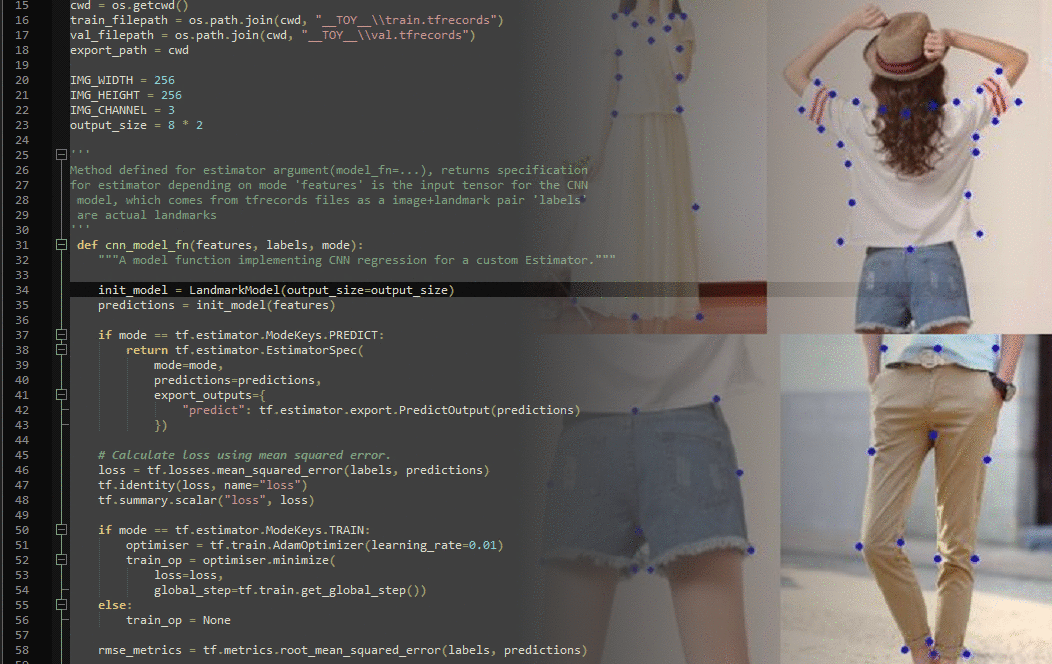
Project Summary
The problem to be solved in this project was detecting (the coordinates of 8) keypoints on pictures of garments with a deep learning model. The problem was inspired from Fashion Landmark Detection in the Wild by Liu et al, who also provided the dataset.
With a supervised learning learning algorithm I was able to make the most of the massive, hand-labelled dataset of over 100,000 images. In feature selection I reused some existing features from the dataset, but some preprocessing still took place.
I chose TensorFlow as my machine learning platform due to its extensive and adequately documented libraries. Given this was a computer vision problem I chose to design a convolutional neural network and explore tuning hyperparameters to increase performance.
The focus of this project was learning how to use Google’s machine learning library TensorFlow. This was achieved by writing a training loop from scratch along with a deep learning model of my own. Additional to the code, I wrote an accompanying dissertation where I presented my findings and lessons and discussed the state of computer vision in 2020. In it, I disentangle the broad field into problems to be solved, why they need to be solved and the algorithms already in existence.
This project was completed 27/05/2020. The code can be found on my GitHub page.
Keywords
Python3, CNN, ConvNet, TensorFlow, Pillow, pandas, computer-vision, ml-pipeline
Delivery
Coming into this project I had already coded quick implementations with Keras, which is a high level API that runs on top of TensorFlow. That proved to be useful when I took on this project because I knew where to start. The TF documentation was also of great help despite some missing entries. In the case of missing entries I could easily access TensorFlow source code on GitHub. As this was my first time coding with this library, I first did an exercise: Coding the VGG16 network from scratch using TensorFlow attributes and methods.
VGG16 is a deep convolutional network first proposed by Simonyan et al in “Very deep convolutional networks for large-scale image recognition.” arXiv preprint arXiv:1409.1556 (2014).. This structure also is used in the main paper this project was concerned with.
As a result of this exercise, I got comfortable with some basic tf attributes/concepts:
tf.variable_scope- A context manager for defining ops that creates variables.tf.nn.conv2d- Computes a 2-D convolution given input and filter tensors.tf.nn.bias_add- Adds bias to a value. Used to prevent overfitting.tf.nn.max_pool- Performs max pooling on given input, “accumulate” features to prevent overfitting.tf.nn.relu- Computes rectified linear unit activation, a simple function, makes for easy optimisation.tf.constant- Creates a constant tensor from a tensor-like object.tf.placeholder- Inserts a placeholder for a tensor that will be always fed (but not necessarily evaluated).tf.matmul- Multiplies matrix a by matrix b, producing a * b.tf.reshape- Reshapes a tensordisable_eager_execution- Use Graph execution as opposed to eager exection. Is quicker for large model training.
Dataset and setup
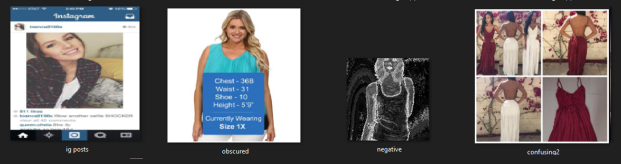
The dataset was made up of 123,000 images of varying dimensions. The images depict garments worn by people, in different poses and settings, or laid out on various surfaces, in differnt folds, colours, positions, some in more recognisable shapes than others.
Images with with one piece of clothing laid out neatly, whose outline and shape is clearly visible whether on or off a person should be easy to learn. Unfortunately this dataset was quite noisy, with images sometimes not having any garments in them at all, or:
The labels that came with the dataset were: visibility of each landmark, type of fashion item (upper body, lower body, full body), pose and respective ease of detection (normal, facing the camera - easy, zoomedin photo - medium, selfie - hard etc). Out of these, I only used the coordinates of each of the 8 landmarks and their respective visibilities (0 if outside the image, 1 if visible)
For testing and debugging with a toy dataset I used a Windows 10 Laptop running Intel i7 with 4 CPUs, 12GB RAM and an AMD 2GB GPU. I also played around with AWS Sagemaker and an Elastic Cloud EC2 Instance but decided to stick with the 2 GeForce GTX 1080 Ti GPUs available for free at my university at the time for full dataset training.
Tensorflow
To begin with, I serialised the data (filename, encoded image and label landmark coordinates) into tf.Examples, one for each datapoint (image). These tf.Examples would be then written to an output file (a TFRecords file) with tf.io.TFRecordWriter.
There are a number of methods to feed in data into a TensorFlow model. In my case, given the massive dataset, the TFRecords option was ideal thanks to:
- efficient storage and
- fast I/O, thanks to protocol buffer binary serialisation and
- self-contained nature of files (single file needed as input) This prevented the reading of data from being a bottleneck to training.
Once the data was prepared, I drew up a deep learning CNN model with more than 10 convolution, pooling and dense layers in a separate file, along with a method that implements these specifications.
The cnn_model_fn defines the tf.estimator.Estimator that wraps the model. This is where hyperparameters like learning rate, evaluation metrics and loss function are found, along with a call to the actual deep learning model. This function requires 3 arguments: features (the input tensor for the CNN model, coming from the TFRecords file), labels (known correct landmarks), and mode (tf.estimator.ModeKeys.TRAIN, EVAL or PREDICT)
The function input_fn is the one that gets things into motion. When tf.estimator.train or evaluate is called, this function is passed in as an argument. In minibatches, unpacked tf.Examples are fed into the model one by one for training or testing. Other hyperparameters can be found in and around this function, like number of epochs and number of steps per epoch.
A _parse_function method, used by the aforementioned input_fn, parses tf.Examples in the TFRecords input file and unpacks them into images and their respective labels. Additionally, it creates an iterator that can feed Examples one by one. The unpack operation is done according to a feature dictionary defined inside this function.
Finally TensorFlow offers TensorBoard, a way of visualising the model pipeline and the model itself . At the time of writing I am learning about explainability as an emerging issue in commercial uses of ML. I am now learning Tensorboard is a great tool that can offer some insight into the inner workings of a model, and how a prediction is made.
TensorBoard allows you to visualise the TensorFlow graph that your pipeline creates. As I was using Graph execution as opposed to eager execution, my prototyping with a toy dataset generated tf.Graphs. In an intermediate version of this project, my TensorBoard graph looked like this:
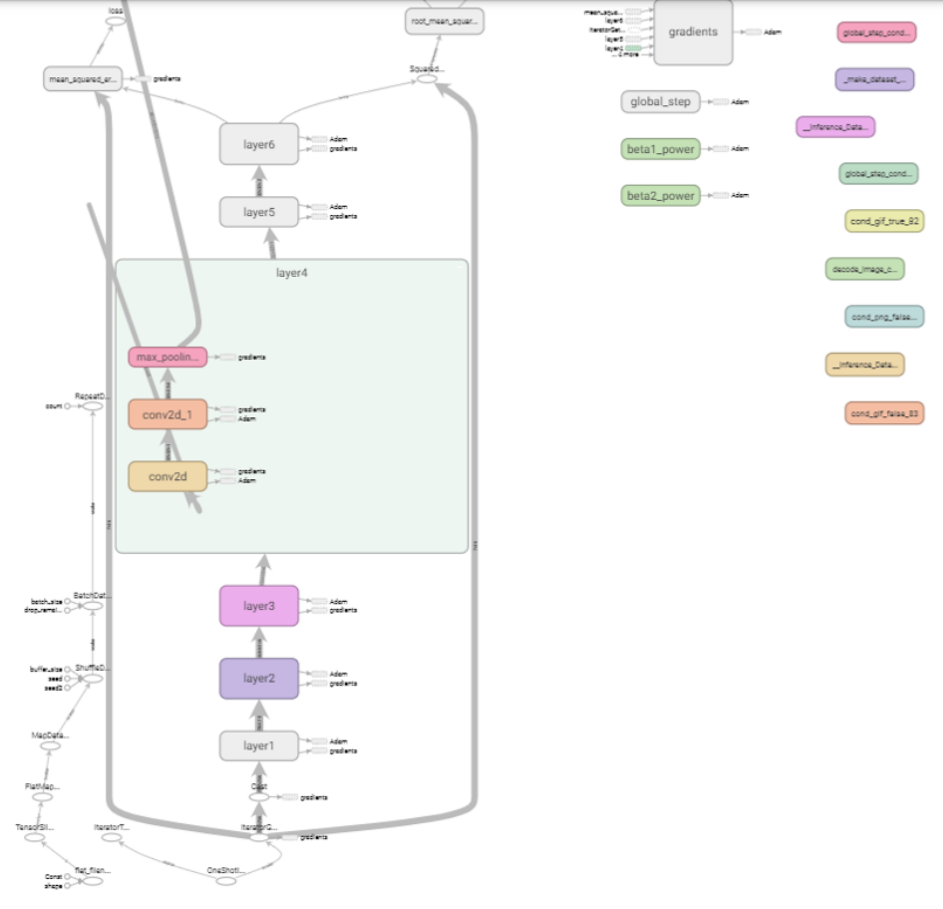
A graph like the one above contains a set of tf.Operation objects which represent units of computation, and tf.Tensor objects which represent the units of data that flow between operations.